


MOD-LIST
Mods 1: Files & Tools
Script Hook V + Native Trainer (LINK)
Download the file and unpack into a temporary folder. Then move the content of the "bin" folder into the GTA 5 game folder.
Community Script Hook V .NET (LINK)
Download the file and unpack into the game folder.
LUA Plugin for Script Hook (LINK)
Download the file and unpack into the game folder.
NativeUI 1.8 (LINK)
Note: Don't use the latest version 1.9.1, as it has some compatibility
issues. 1.8 works perfectly.
Download the file and unpack into the "scripts" folder inside the game
folder.
OpenIV (LINK)
Download and install the program.
*This will be the primary tool for installing mods. It works like a regular file
explorer, except it can read/write inside the GTA 5 file-packages.
OpenIV Setup:
1: Start OpenIV. When it asks for file-path, point to the GTA 5 game folder.
2: When the program has loaded, go to the menu and click "Tools", then "ASI
Manager".
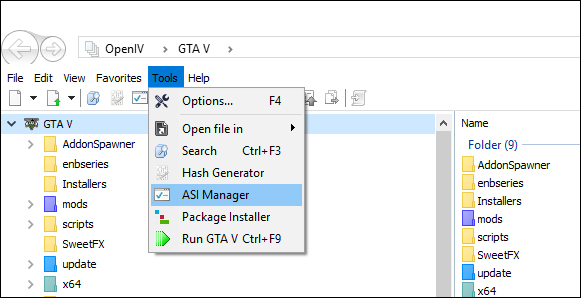
3: Install all 3 ASI files
Note: Whenever a file needs to be modified or added, click "Edit mode" or the
program will only let you view the files, not modify them.

Video
tutorial (if needed)
Mods 2: Traffic
DLC&Add-On Vehicles Spawn on Traffic (LINK)
Download and unpack the file into the game folder.
This will make new cars appear in traffic.
CScenarioPoint Patch (LINK)
Download and unpack the file into the game folder.
*Needed for World of Variety
Simple Trainer for GTA V (LINK)
Download and unpack the file into the game folder.
*Needed for World of Variety
World of Variety (LINK)
Unpack the files into a temporary folder, then open OpenIV and click "Package
Installer" from the "Tools" menu.
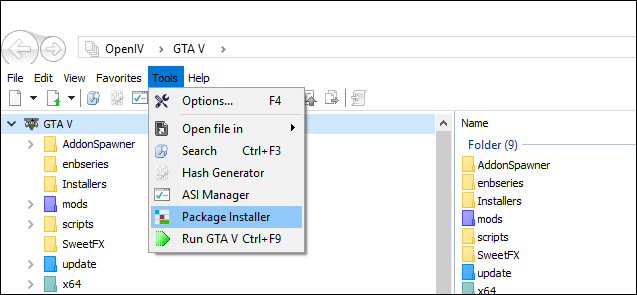
Navigate to the temporary folder, and click the "wov.oiv" file.
Click Install
When done, delete the temporary folder.
Mods 3: Graphics (Part 1)
Make Visuals Great Again (LINK)
*If the site is down, download the file from here instead (LINK)
Download and unpack the files to a temporary folder. Then open OpenIV and click "Package
Installer" from the "Tools" menu.
Navigate to the temporary folder, and click the "MAKE VISUALS GREAT AGAIN -
2.65.oiv" file.
Click Install
When done, you can delete the temporary folder.
NOTE: There are plenty other great mods that change the graphics. You can
choose any one you like, just only choose one. I recommend MVGA, but choosing
the right mod ultimately depends on your personal taste. The four most popular mods are:
Make Visuals Great Again (LINK)
*My recommendation
GTA V Redux (LINK)
VisualV (LINK)
NaturalVision Remastered (LINK)
GTA V Redux is the biggest and most popular mod. However, in my opinion, not all
of it's changes are for the better. MVGA changes fewer things, but all for the
better.. In my opinion.
Comparison videos
(Make Visuals Great Again / GTA V Redux / Original)
Comparison video (Original / VisualV / NaturalVision)
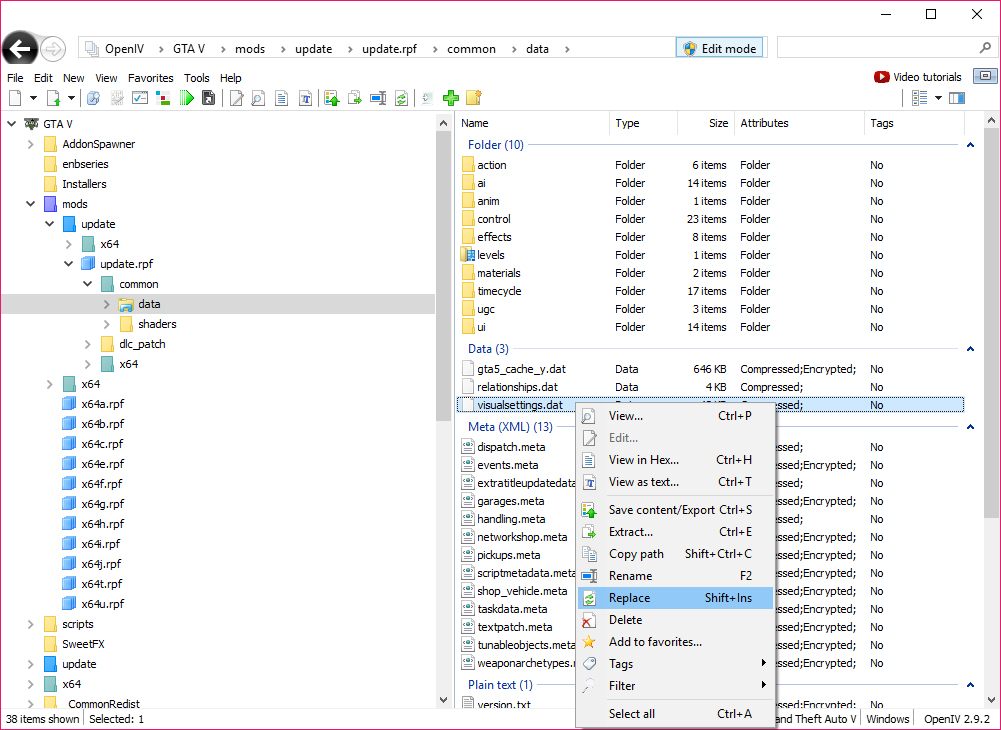
Better rain & puddles for MVGA (LINK)
Download and unpack the file to a temporary folder. Open OpenIV and click
the "Edit mode" button.
Navigate to: "mods/update/update.rpf/common/data".
Right click "visualsettings.dat" and select "Replace". Navigate to the temporary
folder and select "visualsettings.dat".
Close OpenIV and delete the temporary folder.
Mods 4: Game configuration
M7 More Pedestrians and Cars (LINK)
Download and unpack the file into a temporary folder. Open OpenIV and click
the "Edit mode" button.
Navigate to: "mods/update/update.rpf/common/data".
Right click "gameconfig.xml" and select "Replace". Navigate to the temporary
folder and select "gameconfig.xml".
Close OpenIV and delete the temporary folder.
*Note:
This mod does two things:
1: It will increase the number of pedestrians around the city to about 2.5
times the default, and slightly increase traffic to about 1.5 times. This gives
the world a more realistic look, without overcrowding it.
2: It will also make the game ready for adding more vehicle types. Without this
mod, the game will become increasingly unstable the more content is added.
*There are two other mods that seeks to do the same thing:
Gameconfig for Limitless Add-On Vehicles (LINK)
Gameconfig for Add-On Crash Fix (LINK)
On my system, my own mod "Game Stability & More Peds" works
significantly better than any of those. However, it might be different from
system to system, so if for whatever reason "Game Stability & More Peds" does
not provide a stable game for you, maybe try one of the other two mods instead.
Time Scaler (LINK)
Download and unpack into the GTA 5 game folder.
Better Time Scaler ini (LINK)
Download and unpack into the GTA 5 game folder. Overwrite.
With this ini file, the in-game menu will work (F6), and it will remember the
time-scale next time you load the game.
Mods 5: Pedestrians
Hot Coffee (LINK)
Download the file and unpack into the "scripts" folder inside the game
folder.
This is the legendary mod from San Andreas that adds interaction between the
player and pedestrians. This mod is not essential in any way.
Nude Beach Girls (LINK)
Download and unpack the file to a temporary folder. Open OpenIV, and click
the "Edit mode" button.
Navigate to: "mods/common.rpf/data/ai". Add the "ambientpedmodelsets.meta"
file, replacing the existing file.
AddonPeds (LINK)
This is a tool for adding new pedestrians to the game instead of replacing the
existing ones.
Download the file and unpack into the game folder.
Move the "dlcpacks" folder into "mods\update\x64\dlcpacks\"
Make a desktop shortcut to "AddonPeds Editor.exe".
Open OpenIV, and click the "Edit mode" button.
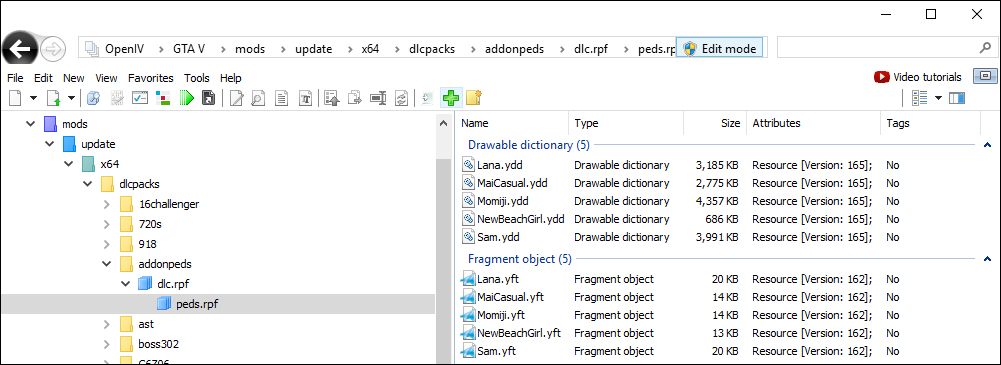
First navigate to: "mods/update/x64/dlcpacks/addonpeds/dlc.rpf/peds.rpf",
and delete all files inside the file. (Unless you actually want those
pre-installed characters).
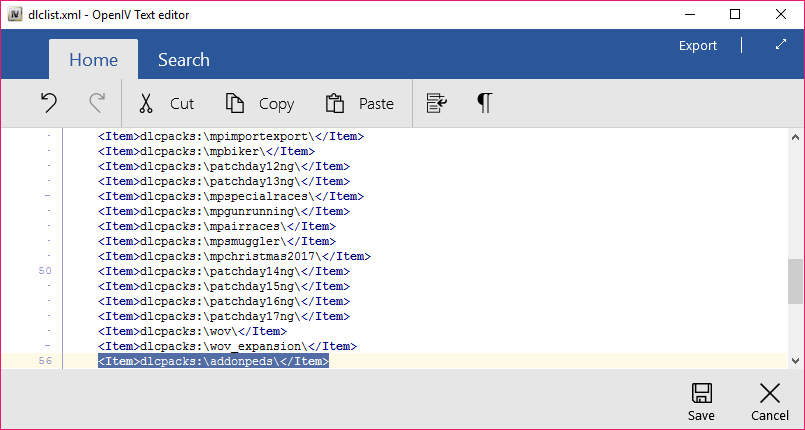
Then navigate to: "mods/update/update.rpf/common/data".
Right click "dlclist.xml" and select "Edit". Now insert the following line:
"<Item>dlcpacks:/addonpeds/</Item>". See image.
Install instructions: (LINK)
Video tutorial (if needed)
Ped Spawner (LINK)
Download the file and unpack into the game folder.
This will make it possible to change the players look in-game.
Mai Shiranui King Of Fighter (LINK)
Download and unpack the file to a temporary folder. Open OpenIV, and click
the "Edit mode" button.
Navigate to: "mods/update/x64/dlcpacks/addonpeds/dlc.rpf/peds.rpf".
Click the little green Plus sign. Navigate to the temporary folder and select
the "Korean Style Custom" files. Then add the "SNK Shiranui Mai" files
as well. I don't recommend adding the "kimono & chinese dress" files, as this
dress doesn't really fit the game.
Close OpenIV and delete the temporary folder.
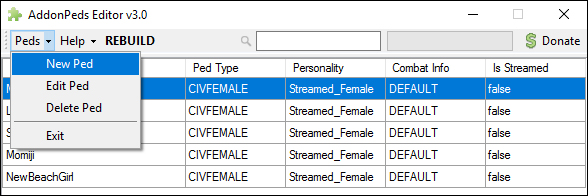
Open the Addon Peds Editor
Click the "Peds" menu, and select "New Ped"
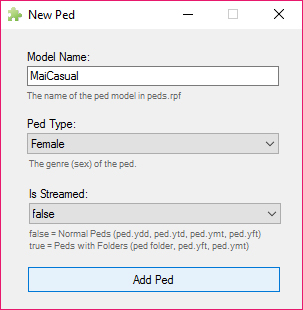
Type in the name, in this case "Mai", and click ""Add Pad". *The name
HAS to be the exact same name as the ped files.
*Set "Ped Type" to "Female" and "Is Streamed" to "false". *See image below
Click "New Ped" again, and this time add "MaiS"
Now click "REBUILD" and close the program when done.
Momiji Dead Or Alive 5 (LINK)
Download and unpack the file to a temporary folder. Choose which version you
like. I recommend "custom momiji (luxury)" both sets, and "Default Momiji
(Normal)" also both sets.
Now rename all files inside the set-folders, so they all have different names. It can be any name, just not the name they already have, as that
would replace another pedestrian. Example: Name the files in Set 1 "Momiji", and
the files in Set 2 "Momiji_2" and so forth.
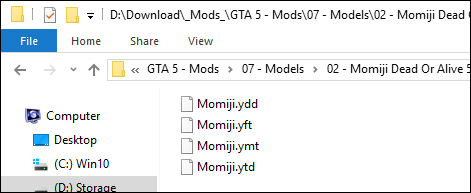
Now open the Addon Peds Editor and follow the same procedure as with the
previous mod. Add each set, and then Rebuild.
Ada Wong Custom Casual (LINK)
Download and unpack the file to a temporary folder. I recommend adding Set A, B
and C. Same procedure.
Ada Wong Resident Evil 2 Remake (LINK)
Download and unpack the file to a temporary folder. I recommend adding both
sets. Same procedure.
Sims 4 Custom Female Ped (LINK)
Download and unpack the file to a temporary folder. I recommend adding both Lana
and Samantha. Same procedure.
Tifa Lockhart Custom Casual (LINK)
Download and unpack the file to a temporary folder. I recommend adding Set A, B, C
and D. Same procedure.
Tifa Lockhart Final Fantasy 7 (LINK)
Download and unpack the file to a temporary folder. Same procedure.
Lisa Hamilton (N) (LINK)
Download and unpack the file to a temporary folder. Same procedure.
New beach girl (LINK)
Download and unpack the file to a temporary folder. Choose which version you
like. I recommend "new girl - transparent".
Now rename all 4 files inside the version you chose, so they all have the same
name. It can be any name you like, just not the name they already have. Example:
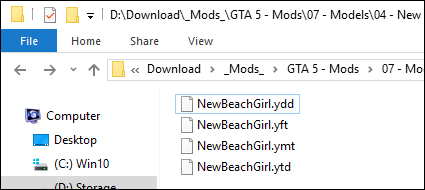
Add the files using Addon Peds Editor.
Hookers Improved (LINK)
Download and unpack into a temporary folder.
Open OpenIV and click the "Edit mode" button.
Navigate to: "mods\update/x64/dlcpacks/mppatchesng/dlc.rpf/x64/models/cdimages/mppatches.rpf".
Right click "s_f_y_hooker_01.ytd" and "s_f_y_hooker_02.ytd" one by one and
replace them with the files from the mod. (Skip "s_f_y_hooker_03.ytd")
Close OpenIV and delete the temporary folder.
New Hookers (LINK)
Download and unpack into a temporary folder.
Open OpenIV and click the "Edit mode" button.
Navigate to: "mods\update/x64/dlcpacks/mppatchesng/dlc.rpf/x64/models/cdimages/mppatches.rpf".
Right click "s_f_y_hooker_03.ytd" and replace it with the file from the mod.
Close OpenIV and delete the temporary folder.
New Strippers (LINK)
Download and unpack into a temporary folder. The unpack "v1.rar" into the
same folder.
Open OpenIV and click the "Edit mode" button.
Navigate to: "mods\update\x64\dlcpacks\mppatchesng\dlc.rpf\x64\models\cdimages\mppatches.rpf".
Right click "s_f_y_stripper_01.ytd" and replace it with the file from the mod.
Navigate to: "mods\update\x64\dlcpacks\patchday3ng\dlc.rpf\x64\models\cdimages\patchday3ng.rpf".
Right click "s_f_y_stripper_02.ytd" and replace it with the file from the mod.
Close OpenIV and delete the temporary folder.
Full nude stripper_02 (LINK)
Download and unpack into a temporary folder.
Open OpenIV and click the "Edit mode" button.
Navigate to: "mods/update/x64/dlcpacks/
Add the "stripper2nude" folder.
Navigate to: "mods/update/update.rpf/common/data/"
and edit "dlclist.xml".
Add the following line at the end "<Item>dlcpacks:/stripper2nude/</Item>"
Mods 6: HD Textures
Better Moon Texture (LINK)
Download, unpack and open OpenIV. File path: "mods\x64a.rpf/textures/"
Replace file.
Michaels House Full Retexture (LINK)
Download, unpack and open OpenIV. The files are put in folders with the
file-path names.
Replace files.
Soda Vending Machines (LINK)
Download, unpack and open OpenIV. Install the files from the folder "coca&pepsi
HD". Unless you want different soda brands.
File path for "v_coin_op.rpf": "mods\x64i.rpf\levels\gta5\props\recreational\v_coin_op.rpf\"
File path for "v_int_68.rpf": "mods\x64h.rpf\levels\gta5\interiors\v_int_68.rpf\"
Replace file.
Stripclub Redux (LINK)
Download, unpack and install with OpenIV.
Mods 7: New Cars
Add-On Vehicle Spawner (LINK)
Download the file and unpack into the game folder.
*There are literally thousands of car mods for GTA 5. (LINK)
You can install any you like, just follow the instructions on the page or inside the
mod packages.
There are two types of car mods: "Replacers", which will replace a vehicle from
the game, and "Add-Ons" which will add a new car to the game. You
can install as many replacer cars as you want without problems, but you can only
install as many Add-On cars as your system can handle. If you install too many,
the game will crash randomly. Personally I don't have the need for an excessive
amount of car types, so I never hit that limit.
The following mods are my personal car picks. They are all tested and works
perfectly (Provided that you use the "M7 More Pedestrians and Cars" mod):
1970 Pontiac Firebird Add-On (LINK)
Download, unpack and open OpenIV.
1: Copy the folder "tkmods"
into "update/x64/dlcpacks/".
2: Edit "dlclist.xml".
File path: "update/update.rpf/common/data/".
Add the following line: "<Item>dlcpacks:/tkmods/</Item>".
3: Edit "extratitleupdatedata.meta".
File path: "update/update.rpf/common/data/".
Add the following lines:
<Item
type="SExtraTitleUpdateMount">
<deviceName>dlc_tkmods:/</deviceName>
<path>update:/dlc_patch/tkmods/</path>
</Item>
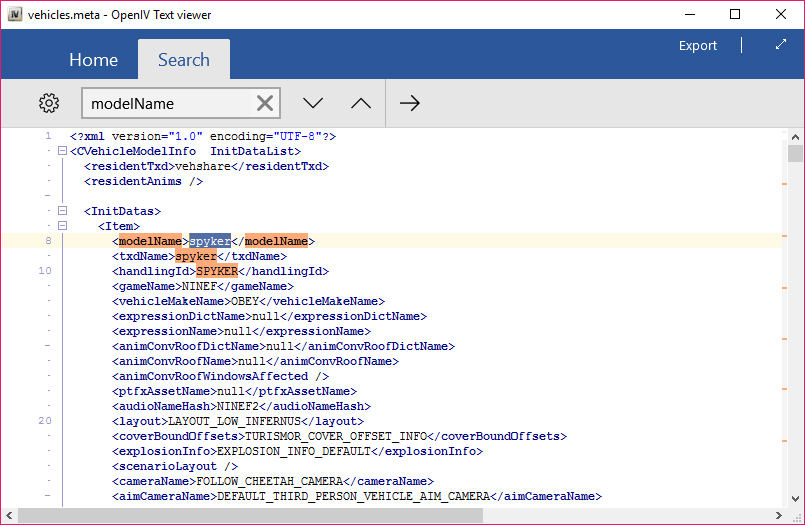
4: Find the car model name: View "vehicle.meta" inside the car dlc file.
"update/x64/dlcpacks/tkmods/dlc.rpf".
The
"vehicle.meta" file can be located different places,
but in this case here: *See image
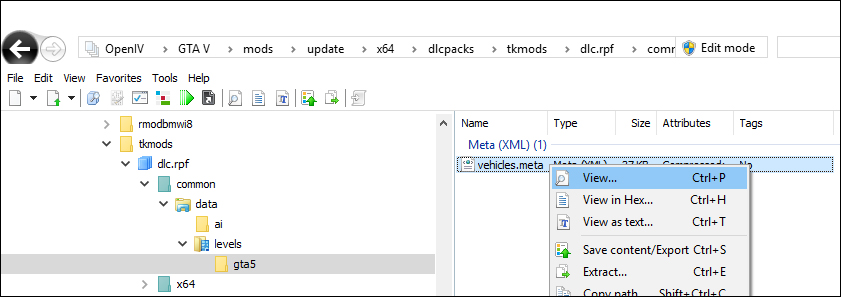
Use the "Search" box and put: "modelName". In this case there are
several car model names. Write them all down.
5: Edit "AddedTraffic.xml" with notpad. *File path: "scripts\" (In the root of the game folder, not in the "mods" folder)
Scroll down to "<Downtown>", and add the car model name(s)
in the same format as the DLC cars already in the file.
In this case, add the following:
<string>spyker</string>
<string>moss</string>
<string>charger</string>
<string>cx75</string>
<string>vulcan</string>
<string>dbs</string>
<string>firebird</string>
*In addition to adding them under "<Downtown>", I would also add them under
"<Vinewood>" and "<LosSantos>". You can of course add them to any location you
like, but these are the 3 main locations.
BMW I8 AC Schnitzer Add-On (LINK)
Download, unpack and install with OpenIV.
Use "RmodCustoms_BMWI8_1.2.oiv".
*This will do everything automatically, except adding the model-name to the "AddedTraffic.xml".
Add: ",rmodbmwi8".
1969 Ford Mustang Boss 302 Add-On (LINK)
Install this car the same way as the Firebird mod.
Lamborghini Reventon Autovista Add-On (LINK)
Download, unpack and rename the folder "Files" to "reventon".
Then install the same way as the previous mod.
2015 Porsche 918 Spyder & Weissach Kit Add-On (LINK)
Install as usual.
2010 Dodge Challenger SRT8 (Rampage Edition) Add-On (LINK)
Install as usual.
2013 Maserati GranTurismo MC Stradale Add-On (LINK)
Install as usual.
2017 McLaren 720S Add-On (LINK)
Install as usual.
Porsche 911 R 2016 Add-On (LINK)
Download, unpack and rename the folder "Files" to "p911r".
Then install the same way as the previous mods.
Ford Mustang GT NFS + GT500 2013 Add-On (LINK)
Install as usual.
Chevrolet Corvette C6 Z06 2006 Add-On (LINK)
Install as usual.
2013 Aston Martin Vanquish Add-On (LINK)
Install as usual.
2013 Lamborghini Aventador LP700-4 Roadster (LINK)
Install as usual.
2005 Ford GT (LINK)
Install as usual.
2020 Ferrari F8 Tributo (LINK)
Install as usual.
2020 Nissan GT-R Nismo (LINK)
Install as usual.
2020 Porsche 911 Speedster (LINK)
Install as usual.
Bravado Gauntlet Classic (LINK)
Install as usual.
McLaren MP4-12C (LINK)
Install as usual.
Ferrari Laferrari Aperta 2017 (LINK)
Install as usual.
Pontiac Trans Am 1977 Replacer (LINK)
*This is a replacer mod. It will replace the Phoenix car
model. If you like the Phoenix better, then don't install this mod.
Download and unpack to a temporary folder. Open OpenIV and navigate to:
"update\x64\dlcpacks\patchday3ng\dlc.rpf\x64\levels\gta5\vehicles.rpf"
Replace the 3 Phoenix files
Open: "Handling.meta" from the temporary folder with a notpad.
Search "Phoenix" and copy all data from "<handlingName>PHOENIX</handlingName>"
to the next "</Item>"
Navigate to: "update\update.rpf\common\data\" and edit: "Handling.meta".
Search "Phoenix" and insert the data from the mod file.
Mods 8: Graphics (Part 2)
ENB 2.75 (LINK)
Download and unpack the file, then move the content of the "WrapperVersion"
folder into the GTA 5 game folder.
*Download mirror, in case the ENB site is down: (DOWNLOAD)
G5BP ENB 2.75 Settings (DOWNLOAD)
Download and unpack into the GTA 5 game folder. Overwrite.
The game is now fully modded and ready for launch!